Showing posts with label foodie Christmas presents. Show all posts

Monday, 25 February 2013

Darázsfészek Walnut Bun Cake


Variations on this tasty treat can be found all over Europe. In Hungarian it literally translates "wasp's nest" and is usually made with walnuts, cocoa or cinnamon. Makes a great brunch or delicious breakfast buns but it's also great as a celebration cake to have around any holidays or take it to your friend's house as a present. It can be baked in a round tin or a square roasting tray but make sure the dish is deep enough for the buns to rise. A couple of things make this cake really soft and fluffy, one of them is scalding the milk with the butter before adding it cooled down to the dough. And the other is brushing the buns with hot sweet milk while they are baking. This will also add a lovely shiny glow to its finish. This quantity will fill a large 30x40 baking dish. But I wanted to make round cakes so I used a 23cm round and a smaller 20cm cake tin. It freezes well if you are not likely to finish the whole lot in a hurry. Best served with fresh vanilla custard.

For the dough:
500g plain flour
7g dried yeast
50g icing sugar
60g butter
200ml milk
pinch of salt
3 eggs, beaten

Filling:
200g walnuts, ground to a coarse breadcrumb texture with a food processor
100g butter
100g icing sugar

For the top:
150ml milk
50g granulated sugar
few drops of vanilla extract

First make the dough. Heat up the milk with the butter until almost boiling, then let it cool to room temperature. Sift the flour, yeast, icing sugar, salt into a bowl and mix well.  Add the beaten eggs and then the lukewarm milky butter mix. Mix thoroughly and knead for 10-15 minutes until the dough comes off the sides of the dish. Either leave in a warm place to double in size for about an hour, or leave it in the fridge overnight for slow cold fermenting like I did. You achieve the same result but the latter gives you a more stable, more digestible and easier to handle dough that will be ready for baking in the morning. When you are ready to bake, bring the dough to room temperature for 30 minutes if it's in the fridge. Knead it briefly on a floured surface, then divide into two. Roll out each to a 30x40cm rectangle shape. Brush it with melted butter, sprinkle with icing sugar and walnut equally divided between the two. Roll up from the longer end and cut up into 5cm discs. You will get around 16-18 buns. Place them into a buttered baking dish or cake tin, loosely next to each other and put the tin(s) in the oven, then switch the oven on 180C/gas mark 4. While the oven is warming up, the buns will have time to prove once again. From that point it takes around 30 minutes to bake them ready, during which time you can warm up the milk with the sugar and vanilla until almost boiling, and brush the buns with the milk as soon as they start to colour a couple of times while baking. My oven is really fierce so I covered the cakes with tinfoil once they reached a nice golden colour. It is done when the testing skewer comes out clean. Leave it to cool on a wire rack and it will keep fresh for a couple of days or also freezes well. Defrost thoroughly and warm up in the oven for 5 minutes before serving it with fresh vanilla custard.


Wednesday, 12 December 2012

Christmas poppy seed roll Mákos Beigli


As you wouldn't have Christmas without szaloncukor it's also traditional to have these sweet yeasty bread rolls filled with sweet creamy poppy seed or walnut paste. They are very popular around Christmas (Karácsony) and Easter (Húsvét) and generally any celebration times in the whole of Eastern Europe and also in Jewish cuisine. Having spent the past week at home with a sick toddler while desperately hoping to get fit for our fast approaching Christmas trip to Australia - to lift the Christmas spirits I had to make this Mákos Beigli and it turned out lovely. There is much anxiety around beigli making, I didn't find it difficult or time consuming and this was the first time I made it - my Mum has always done it for the whole family, including vast quantities of frozen supplies for us in the UK if we happened to spend the holidays here :-) I have based it on the tried and tested Horváth Ilona recipe, only changed a couple of things to make it quicker and easier for the dough to rise. This quantity makes 2 large or 4 medium size rolls.

For the dough:
500g plain flour
250g butter
2 eggs
50g caster sugar
20g fresh yeast (or 7g dried yeast, can add straight to dry ingredients)
200ml milk
pinch of salt

For the filling:
300g black poppy seed
200g sugar
300ml milk
vanilla pod (seeds scraped out) or few drops of vanilla extract
grated zest of a lemon
50g semolina
handful of sultanas soaked in a splash of dark rum


To make the dough sift the flour into a bowl with the salt, add the sugar and mix well. Warm up the milk a little until lukewarm. Mix 50ml milk with a teaspoon of the sugar and crumble the yeast into it, mix until creamy then add to the flour. Melt the butter into the rest of the warm milk and add this to the flour too. Knead it until well mixed and the dough comes away from the side of the bowl. Cover and leave in a warm place for an hour to rise and double in size while you make the filling.
Grind the poppy seeds together with the sugar using a coffee or spice grinder. Warm up the milk with the vanilla until boiling, take it off the heat and add the ground poppy seed-sugar mix, lemon zest, semolina, rum soaked sultanas with their liquid. Mix well and let it cool.
Take the dough and divide into 2 or 4 pieces depending on the size of the beigli you want to make. Roll each one out to a rectangle shape to about 5mm thickness, spread the filling evenly on top, leaving the edges clear. Fold the short sides in slightly to keep the filling in, then roll it up starting from one of the long sides. Place on a baking sheet, fold side down, leaving a generous gap between the rolls. Preheat oven to 180C/gas mark 6. Brush the pastry with a beaten egg and leave it to rest until the oven is ready. Pierce the sides in several places with a sharp fork, this will prevent the rolls from splitting. Bake for 25-30 minutes until golden colour and cooked through. Cool and dust with icing sugar.

Thursday, 29 November 2012

Cherry and Almond Advent Wreath


In Hungary Advent wreaths are normally made of fir, pine cones and 4 candles for the 3rd Sunday before Christmas, to light a candle each Sunday and then the last one on Christams Eve. I was so happy to discover that people also bake them, in fact some bake one for each Sunday of Advent! I think it's a lovely thing to do and you could decorate it with small candles if you wish.
I based the recipe on the Norwegian kringle wreath from Scandilicious Baking and glad I did. The distinctive flavour of ground cardamom in the dough and the lightness of this sweet milky bread is fantastic. I added kirsch soaked dried sour cherries instead of sultanas as they go so well with the almond paste that is the filling for this wreath. The sugar crystals and almonds on top make it look really festive too.

For the dough:
300ml whole milk
75g butter
500g plain flour
1tsp ground cardamom
3/4tsp salt
7g dried yeast
1 egg, beaten

Filling:
50g dried sour cherries
3-4tbsp kirsch or cherry liqueur
150g marzipan 
75g ground almonds
50g butter
1tsp vanilla extract
1 egg, beaten
1/4tsp salt
2-3 tbsp caster sugar

To finish:
1 egg, beaten
flaked almonds
sugar crystals (I used Lidl's edible cake decorations) or crushed sugar cubes

Scald the milk by heating it with the butter until almost boiling, this will make the bread softer. Let it cool to lukewarm temperature. Sift together the flour, sugar, cardamom, salt and dried yeast and mix well. Add the beaten egg and the slightly warm buttery milk and mix it until you get a smooth dough that comes off the sides of the bowl. Cover and let it prove in a warm place until doubles in size, for 30-40 minutes.
Make the filling by soaking the cherries in the kirsch. Mix all the filling ingredients together (add sugar to taste) in a food processor until you get a creamy paste.
Roll out the dough on a floured surface so it is a long thin rectangle of about 15x60cm. Spread the filling evenly over the dough, drain the cherries and sprinkle these over evenly. Roll it up into a cylinder, starting from one of the longer edges of the rectangle, brushing the other long edge with a bit of water to help seal the pastry. Bring the two open ends together to form a wreath shape and pinch to seal them together. Leave to prove in a warm place for 20-30 minutes. 
Preaheat the oven to 200C/gas mark 6. Glaze the wreath with the beaten egg then sprinkle almond flakes and sugar crystals all over it. Bake for 30-40 minutes until golden brown and hollow sounding when tapped on the base. My oven is really fierce, so I had to cover it halfway with foil, but all ovens are different. Cool on a wire rack before serving. You can also make it in advance and freeze this wreath, in that case defrost in a low 150C oven for 20-25 minutes, then bake at 190C for 5 minutes.

Tuesday, 27 November 2012

Chocolate coated cherries and prunes


I didn't intend to make these sweets. They ended up being a by-product of the szaloncukor batches I was making yesterday, but actually they are really delicious and make great christmas presents! I had some leftover melted dark chocolate I was using for dipping the marzipan nuggets, and didn't want to waste them. I also had open boxes of dried sour cherries and soft stoned prunes. Remembering how nice the shop bought chocolate coated dried fruit can be, I quickly made a couple of handfuls of these little treats. You could use any dried fruit you prefer, golden sultanas, figs, cranberries or even nuts would also be great. I used Lidl's 50% dark chocolate, chopped and melted in a bowl over simmering water. Make sure the bowl doesn't touch the water though. Dip them with the help of a fork and cool on baking parchment. Put in the fridge for 30 minutes so it is properly set, then they are ready to box. I covered a cardboard box with christmas wrapping paper to turn it into a festive gift.

Thursday, 8 November 2012

Chocolate dipped marzipan sweets Marcipános szaloncukor


In Hungary there is no Christmas without szaloncukor. These chocolate coated sweets are essential part of Christmas, you can buy them everywhere in large boxes and they are used as tree decorations. There are lots of different fillings, I chose one of my favourite which is a dark chocolate coated marzipan. Really quick and easy to make at home, they make great presents too, individually wrapped and if you feel adventurous you could hang them up the tree with some ribbon. 

To make about 500g or 35-40 sweets:
200g ground almond
150g icing sugar
few drops of almond extract
200g dark chocolate, chopped
about 40ml water

To make the marzipan, mix the ground almond with the icing sugar and gradually add some water until you get a paste that is easy to knead and mould into balls. Be careful not to add too much water as it will get too soft. Add a few drops of almond extract, knead it until well mixed, now you have your marzipan ready to mould. Form small bite size pieces with your fingers. Put the chocolate in a bowl and melt it over some simmering water, making sure the bottom of the bowl doesn't touch the water. When completely melted, dip the marzipan pieces into the chocolate with a fork and place them on baking parchment. When all done, put them in the fridge to set, this will take about an hour, after which they will be ready to be wrapped.


Friday, 2 November 2012

Tear and share walnut bread - Aranygaluska


Aranygaluska if translated literally means golden nuggets. Sweet, almost doughnut rich yeasty dough nuggets layered with sweet ground walnuts and melted butter. It's a course in itself all year round, except I made this one with star cookie cutters, so it's fit for the Christmas table. If you are making it for other occasions, just use an ordinary round or moon shaped cutter. Traditionally it's baked in a round tin and you are not meant to cut it but eat it in a tear and share style, dunking it into warm custard while it's still warm out of the oven. 

For the dough:
500g plain flour
25g fresh yeast or packet of dried yeast 
3 egg yolks
250ml warm milk
50g melted butter
50g icing sugar
pinch of salt

For the walnut filling:
Grind 200g walnuts to a coarse breadcrumb texture in a food processor. Mix it with 5 tbsp icing sugar. Prepare 100g butter.
 
Make a starter dough by mixing 100ml warm milk, crumbled yeast, teaspoon of icing sugar and 3 tbsp flour. Put in a warm place so the yeast can activate (if using dried yeast, you can leave this stage out and mix all ingredients in one go). After about 15-20 minutes the starter dough should be ready to mix with the other ingredients, adding the melted butter last. Work this dough until smooth and silky and air bubbles start to form while mixing, either with a dough hook in a mixer or by hand with a wooden spoon. Cover and leave in a warm place to prove and double in size, for about an hour.
Take the dough and knead it on a floured surface then roll it out to about 1cm thickness.  
Grease a 26cm loose bottom cake tin. Melt the 100g butter and have it ready in a bowl next to the sugary ground walnut. Start cutting stars out of the dough with the cookie cutter, dip each one into the melted butter then coat with the walnut mix. Place them into the tin snugly next to each other, creating 3 layers of nuggets by the time you used all the dough. Sprinkle the leftover walnut mix on top if there is any. If you don't want to dip every single nugget, then you can just brush each layer with the melted butter and sprinkle with the walnut mix. Preheat oven to 180C and let the cake rest and prove until the oven warms up. Bake for about 40-50 minutes or until it's cooked through. Take the side off the cake tin and serve it warm on the tin base.


Wednesday, 31 October 2012

Chocolate and Walnut Squares


These little nutty truffle like sweets which are also gluten free are lovely to have after dinner with coffee. They are incredibly easy to make as they don't need any cooking or baking. I found this recipe in a fellow foodblogger's recipe collection (Lilafüge) when I was looking for something small, simple and chocolaty to make last weekend.  I adjusted a couple of ingredients to match our UK availability. They are called Diós Kocka and usually served around Christmas, cut into very small squares as they are really intense in flavour, chocolate and walnuts. You could make it with almonds or hazelnuts too, whatever you have in the cupboard. The chocolate ganache on top could be used for various toppings for cakes, very easy to make.

250g ground walnuts
230g icing sugar
1 tsp vanilla extract
50ml water
10g butter
100g dark chocolate, chopped
100ml double cream

Grind the walnuts in a food processor until resembles breadcrumbs. Heat the sugar with the water and vanilla extract until completely melted and starts to boil. Add the walnuts and butter and stir this paste around on a lower heat for a couple of minutes. Pour the mix into a small (I used 20x15cm) lined tin or baking tray, smooth the surface and allow to cool. In the meantime prepare the ganache topping. Heat the double cream in a pan until it is boiling. Take it off the heat and mix in the chocolate pieces until it is really smooth and completely mixed. Pour this on top of the walnut paste, smooth it down with a spatula and let it cool. Put it in the fridge and leave it for a few hours, it will harden even more and will be really easy to cut into small bit size squares.


Wednesday, 24 October 2012

Csokis diós jojó Chocolate and Walnut yo-yo


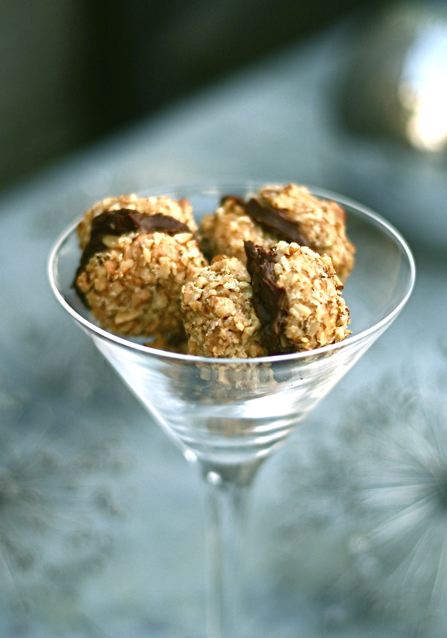
I took a few shots of these biscuits and chose a less christmassy looking one as it is still only October... For those craving for some Christmas glitter there are the silver sprayed Allium heads and a candle in the background :-) These little bite size biscuits are a perfect addition to coffee, tea or a hot spiced drink. Chocolate and walnuts are main ingredients in a lot of sweet dishes, cakes and biscuits around the holidays in Hungary and having a welcome selection of sweet nibbles is very traditional when you are having friends and family around. Box them up they make a great home-baked present too!

For the biscuit base:
350g plain flour
200g butter
150g caster sugar
1 egg
2 egg yolks
few drops of vanilla extract
1 tsp rum
pinch of salt
grated zest of half lemon
1 tbsp milk

For the walnut crunch coating:
2 egg whites, gently whisked
250g chopped walnuts 

For the filling:
100ml double cream
100g dark chocolate, roughly chopped

Mix and knead all the biscuit ingredients until smooth. Cover with clingfilm and refrigerate for an hour. Warm the cream and the chocolate and stir until it's completely melted, then cool it down. When cool, put it in the fridge to chill then lightly beat to get it slightly more firm. Preheat oven to 180C. When well chilled and easier to mould, roll your pastry with your hands into lots of cherry size balls. Dip them into the egg whites then coat them with the chopped walnuts and place them on a lined baking sheet. Bake for 20-30 minutes or until the nuts become a golden toasted colour and the biscuit cooked through. Cool and start assembling the yo-yo's by sticking two discs together with a small teaspoon of chocolate cream filling. This quantity makes about 25 yo-yo biscuits.